Showing posts with label Recycling. Show all posts

Wednesday, September 10, 2014

Repurposing with a vengeance - the stove


Repurposing project #2: RV stove top outdoor kitchen - this idea also came off Pinterest.

I do as much canning as I am able, however a lot of that comes during the hottest parts of the summer and I don't have an a/c cooled kitchen. The first day its not so bad, but by day three, I just don't want to be that hot anymore. So I looked around for a way to do my canning outdoors.

This would be ideal


I could work with this


Even this would do


I did manage a couple of batches in my pressure canner on the campstove. It worked great, but I did have to keep pumping the pressure back up because it had to be on so long. I also tried it on the side burner of the BBQ (propane) It also worked fine, but the weight of the canner had to be counterbalanced. I wasn't comfortable doing it again. One other problem was wind, keeping a constant temperature was difficult.

In the South, there are homes that have what are termed "Summer"kitchens. These are basically kitchens that are completely separate from the rest of the house. They are used for essentially canning, baking during the summer, and other food preparation that is hot and humid. By using the summer kitchen, the home remains cooler because the additional heat and humidity are some place else. I've seen these kitchens as either add-ons to a house or a screened in porch that has been converted. I don't have money to build an add-on and I don't have a screened in porch to convert. What's a girl to do?

I was looking for outdoor ideas for my hubby to do (I'm good to him like that) and found the picture of a three burner, propane fired cooktop in a wood frame. I had found it, just what I wanted for canning outdoors. Now to find the parts I needed. I did quite a bit of looking, placing ads on different sites, asking neighbors and friends, and watching for rv's in the paper. I figured that was going to be the easiest way to locate a propane fired cook top. Hey, remember that windstorm that wiped out my greenhouse? Well we had another one just 10 days later and one thing I noticed on my morning walks was a bunch of RV's and travel trailers demolished by trees. So I began knocking on doors and pleading on social media asking to salvage the cook top from a damaged RV. A few weeks went by and finally someone called and asked if I was still looking. They had a cooktop they could sell me for $30.00. Egads!!! Not what I was hoping for. We haggled and I finally got it down to $12.00.

Picture from Pinterest
With the picture from Pinterest firmly in my mind, I was extremely disappointed when the people showed up with the cook top. What they brought to my house was a stove/range from a motorhome from the 70's (okay, not that old)  and it certainly didn't fit the sleek cooktop look I was envisioning. 


In addition, they also offered the sink and water reservoir at no extra charge. I've gotta say, my brain caught fire, of course I would take those off their hands. (more on that another day). They were very grateful that I could take this stuff from them and I was grateful I got a stove/range, sink and water reservoir all for $12.00...delivered!

Using an old BBQ which had been designated for building that outdoor kitchen I wanted (two years ago), my handy husband set out to fit the appliance into the frame.

He removed the BBQ barrel and set about measuring, cutting, welding, measuring, grinding, and did I mention measuring?

He inspected the propane lines and decided that he would need to get a new gas line to go to the propane tank and a new regulator as well. This was about $60.00 at the big box store.

I kept sneaking out to see how it was coming, but you see those nifty orange things over his ears? Those are the "Huh?" devise or the "ignore the wife's question about how it is coming" tool


Any way, after he was done ignoring my silly questions, this is what he built. Ugly I know, but I was super excited, I had an outdoor kitchen, sort of. 

Of course I posted this picture right away on that social site we all are starting to deny we are part of, you know which one I'm talking about. The responses were varied, everything from "that's so Redneck" to "I wonder if the insurance company will let me keep the oven from our totaled RV?"
I had to try it out right away (not for canning) and decided to cook dinner and dessert on my new outdoor kitchen. This was the 21st of August and if I remember correctly it was pretty warm outside, so the timing was perfect.

What you see there is spaghetti in progress and chocolate chip cookies baked and ready to eat (which I did as soon as they were cool enough to get off the tray)
In the end I removed the old side burner, cut new wood for the "counter", stained and urethaned the heck out of it. The husband fabricated a windbreak on the back and since I can turn the cooktop, I can place that break where I need it. I've canned to my heart's content on this new stove and it's been fabulous. Redneck? Maybe...but my house is not hot.


Friday, August 22, 2014

Repurposing with a vengeance - the greenhouse

Back in the day (when my grandparents were young) you didn't throw away a toaster when it quit working, you fixed it. If your bicycle tire rim got bent you straightened it out. If the car quit running you repaired it. Today we literally live in a disposable society, if it's broke, toss it and buy a new one. It's wasteful and we have taught our children to be that way. Shame on us.

One thing about living providently is learning how to repurpose or recycle items that are no longer usable for their original purpose. Rather than filling our landfills with perfectly usable items, lets see what we can do to reuse them instead.

Repurposing project #1: Trampoline Frame Greenhouse - this idea came off the internet, Pinterest I believe. My husband saw it and thought we could try it out. I found a trampoline frame that someone wanted to get rid of and our greenhouse dream began to come true. We purchased PVC pipe, heavy plastic, self tapping screws, and a few 2 x 2s. We reused the metal legs from the trampoline (screwed together), wood from a deck that have been demolished, and a bit of leftover screen. We watched a few videos on YouTube, but they were not that helpful when it came to actually constructing the greenhouse. Unfortunately, this post does not include instructions for construction, but a few pictures of the process. All in all, the total cost was around $150.00 which isn't too bad for a 12' x 14' greenhouse.

Frame with PVC, Metal tubes and Furring Strips

Back and Front are framed

Rear "Window" for ventilation. 

With it's "Skin" on


Panorama of the inside

Here are a few shots of the plants in the greenhouse as the summer progressed.
June 2014 - Romas, Oregon Springs, Red and Green Peppers. Temperatures were hitting high 90's to low 100's in the greenhouse.


July 2014 -Outside it was in the 90's, inside it was 120+ (my thermometer only went so high). The plants loved it as long as I kept them watered.
 
Aw but then disaster struck. In late July we had a small wind storm (80 mph gusts) and the top of the neighbors tree snapped off and fell right on the greenhouse.
We were fortunate though, the only damage was to the greenhouse.

Squished Oregon Springs
Squished Romas
Greenhouse was a total loss.


We did manage to salvage the PVC pipes, some of the wood, the door, one set of shelves and the tomato plants. Parts of the trampoline frame are too bent to reuse, so we'll find a new frame and see what we can do with the usable pieces from the damaged one. We will rebuild.

Tuesday, April 8, 2014

The Growing Season is Around the Corner

My windowsill starts
Have you started your seeds yet? It isn't too late for some of your veggies like tomatoes, peppers, and pumpkins. There are even some seeds you can plant out now, lettuce, onion seeds/sets, and cauliflower. 

Just a reminder though, don't get too vigorous with your planting yet, the last frost may occur in the first week of May. 

Okay, having said that I usually get my seeds in the ground in mid-April, 1st week of May. My garden is usually pretty successful.
My garden on August 17, 2013
I didn't use the space efficiently and it was a new spot so I didn't choose wisely for the sun, but I wasn't totally disappointed with the harvests. Again having said this...this year we have different plans. 

First, I decided where I am placing my plants based on the knowledge obtained last year as to where the sun hits and when. 

Second, I laid out my garden plan using a free garden planner I found at Growveg.com. You get a 30 day free trial of the planner and you can definitely plan out your garden space in that time. I was impressed with this website. 

Third, instead of burying my potatoes, I am going to try towers. I found a great plan at Growing Lot Suburban Farm. I will putting up 2 of these one with russets  and one with reds. 

Fourth, we are repurposing as much as we can including using a trampoline frame and free discarded wood to make a greenhouse. I'll post pictures of that later.  There are several "plans" out there, but some of them don't make a bunch of sense so we are doing it Jeff's way. But if you want to see what one can look like, check it out here...Organic Adventures in Farming. We also pulled some old metal shelves from the fabrication pile and have using other materials we had lying around, we now have starter shelves for our greenhouse. 

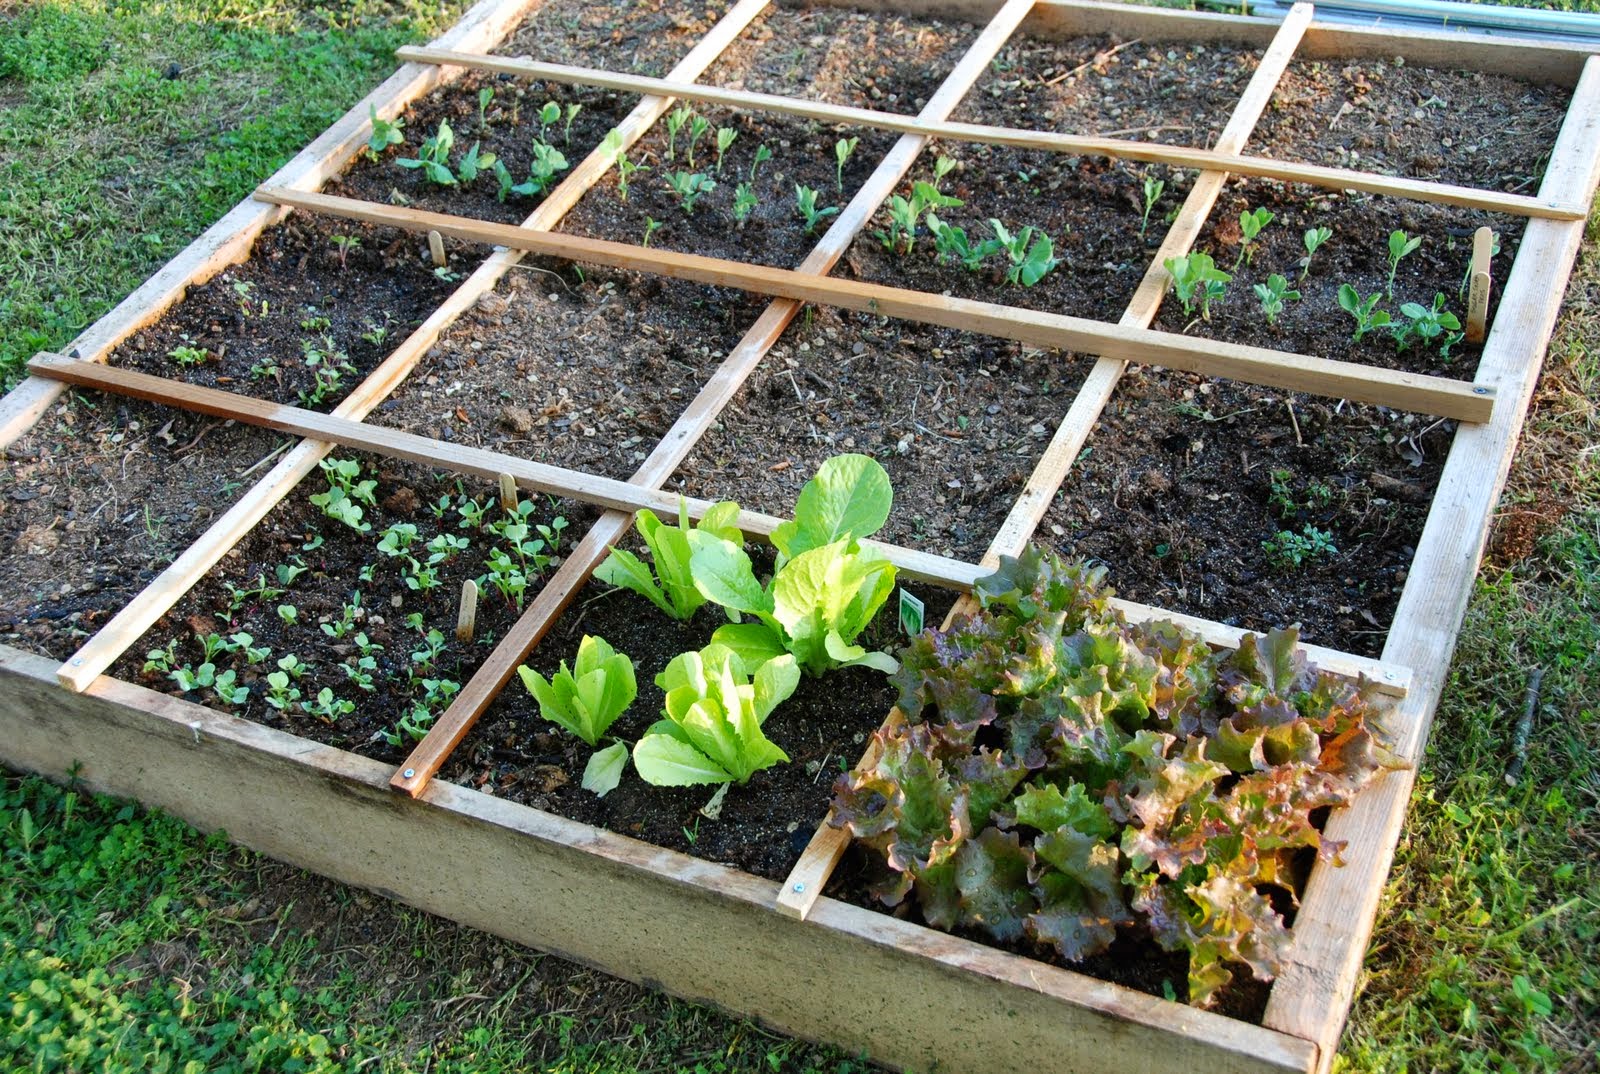
And finally, I am going to experiment with Square Foot Gardening. I've never tried it before, and in my case I have tons of room for rows, but the thought of planting 99 green bean plants is a bit overwhelming, but when it's laid out in a grid like this, it doesn't seem so daunting. We collected used 2" x 6" deck boards and have built our boxes. We had enough left over to build a couple for a daughter as well. I just happened to have some slats under my woodworking bench, so grids are no problem. This could be a way to reclaim some of my backyard.
photo courtesy of http://www.versusbattle.com
You can find pros & cons at VersusBattle.com of either SFG or row gardening.

Good luck and good gardening!


Monday, May 7, 2012

Reclaiming Yarn from Old Sweaters

Fair Warning: I have not yet tried this, but do plan to in the future. This tutorial is from laughing purple goldfish designs. It seemed like such a great idea, I thought I would share.


laughing purple goldfish designs blog:

Much of yarn recycling is trial and error... and everyone develops their own little techniques along the way. I have put together a series of photos which step you through my recycling process, to give you an idea of what is involved.

You will certainly have a million questions for me, especially once you actually start experimenting with the process. Ask away... I'll share everything I know with you!

There seriously are loads of photos here, but the basic steps I follow are:

air the garment
remove trimmings and tags, and undo seams
unravel each piece
wind into a skein
wash
dry
ball

If you are a beginner, I would recommend starting with a single coloured garment, preferably in a simple stockinette. I would avoid cables, fair isle, and anything complicated... until you have had a little practice first. Stick with a standard jumper if possible, and avoid cardigans, coats, or anything with a zipper. A hand knit would be ideal, if you have access to one. Avoid any yarn which looks fluffy or furry or hairy or boucley... because they will be difficult to unravel.

Before I start, I always check the seams. There are 'good seams' and 'bad seams' when it comes to recycling. Overlocked or serged seams are BAD. You will find that the yarn has been cut at the end of every row... so you will end up with lots of short yarn pieces... ugh! So always check the side seams and inner arm seams.

Don't worry if the shoulder or neck seams are overlocked. Because they run across the top of the garment and not down the sides, they are not of concern.

so... some examples of bad seams:


and these are good seams:


So... if the side seams are bound together by overlocking - BAD!

As for hand knits... all of their seams are GOOD... you don't even need to check them!


Time to get started now...


I don't bother washing the garment before I start. Two reasons... Firstly, I don't want to risk any felting or matting of the yarn fibres which would make it more difficult to unravel. Secondly, the yarn is cleaned much more effectively if you wash it AFTER it is skeined.


So I just leave it out on the line for a while, just to 'freshen' it before I start working with it.


I use an unpicker and a pointy pair of scissors to remove tags, labels, buttons, zips, and any other trimmings.


Then I unpick the seams. Most store bought jumpers are seamed using chain stitch, which is wonderfully easy to undo. See the way the chain stitches form little arrows, pointing down in the photo? Well that tells you the direction to unravel in. So cut the top one, free the tail... and pull... it should unravel in seconds.


So now you have all the seams undone (this one had a seam down the centre of the back piece for some strange reason - probably a design feature)


Now it's time to start unraveling each piece, generally working from the top down. The cast off edge forms the same V stitches as chain stitch, and again they point in the direction you need to unravel. So start at the top end and snip, free a tail... and away you go.

Sometimes you might have a hard time getting started. If it's a nightmare for you, just chop the top few rows off, and then start unraveling. You will only loose a few yards of yarn, and it will save your sanity!


I like to roll the garment piece, so I can grip it nicely while I unravel.


I have heard this kind of display referred to as 'yarn barf' and I think it's a wonderful description.

Anyway, if I am working indoors and am going to be able to skein the yarn immediately, then I just pile it on the floor as I unravel. If I am working outdoors I would wind into a ball as I go, and then skein from that... because you really don't want to get this in a tangle!


You can wind your yarn into a skein using two chairs like this...


Or using a skein winder if you have one. This one was a fabulous gift from Mr Goldfish last Christmas... and I love, love, love it!


Once it is all wound on, you need to tie the skein in a figure eight. Use some scrap yarn. I like to use a contrast from the yarn you have wound, so that the ties are easy to locate and removed after drying. I recommend using a light colour, because you would cry if the colour ran from your ties onto you nice new recycled yarn.

First divide the yarn in half as pictured above.


Then pop a scrap piece of yarn through like this...


And back through again, forming a figure "8" with the tie.


Finish with a double knot.


I like to do this in six places around the skein to prevent tangling.


Wash by soaking in warm water and wool detergent. I'm a big fan of Martha Gardener's Eucalyptus Wool Mix, but I'm not sure if it is available outside of Australia.


Gently submerge the skeins. I prefer to soak all the yarn together, so that if it happens to lose any colour, all skeins will be affected evenly.


If possible, I leave it to soak overnight.


Then in the morning, I rinse it in a bucket of cold water.


Of course, with our current water restrictions here... that rinse water gets recycled directly onto my garden...


I gently squeeze the excess water from the yarn, and lay the skeins on an old towel.


Then I lay another old towel on top.


Roll it up, and walk up and down the length of it for a minute or two. This helps absorb a significant amount of water from the skeins.


Then I hang each skein on a plastic coat hanger to dry. I also use a second hanger to 'weight' the yarn slightly, and help stretch some of those kinks out.

If the weather is wet, then I put the coat hangers along a curtain rail in a sunny window and dry the yarn indoors.


When dry, cut the ties off and place the skein back on to the winder or chairs. Find the end and wind into a ball. Click here for my ball winding tutorial.


Interestingly the yarn I have claimed from this jumper is not that nice. I'm actually a bit disappointed with it. It looked nice in the garment, but is now a bit ugh! See the sheen in the balls. That is the rayon component. I liked that sheen until I started unraveling...


You can actually see the cotton and rayon strands here.

The rayon is harsh and grabby and kind of brittle. It actually reminds me of over bleached hair. I'm thinking it may well become hair on a creature or doll at some point. If I want to knit or crochet with it I think I will have to ply it first. I might even ply it with a different yarn to make my own special blend.

I guess the thing is, not to give up... occasionally you get a bit of a dud (like this one) but that just pushes you to think of alternate project ideas.

Most of what I have learned on this topic is through experience, but if you would like to check out the tutorial I first read on the topic, then click here.

http://laughingpurplegoldfish.blogspot.com/