Monday, November 4, 2013

Should you pay your mortgage off early?

Doing a bit of research on this topic, there were quite a few opinions on the issue. Should you pay your mortgage off early? It depends on your situation. Reading a few of these opinions and you can walk away very confused, but it can give you the information you need when you visit with your financial adviser. The one thing I did get from all this information is TALK WITH YOUR FINANCIAL ADVISER BEFORE YOU DO ANYTHING!

Pitfalls of Paying Off Your Mortgage Early

Oct. 4, 2013 By BYRON L. STUDDARD, CFP®

Should you pay off your mortgage? As with so many financial issues, the answer is: It depends.

A couple recently came to me for financial advice – after drastically changing their entire financial situation. They had attended a financial workshop where they became convinced that any debt is undesirable. So they paid off their mortgage early by cashing in their six-figure 401(k) accounts.

Because they were under age 59 1/2, they had to pay a 10 percent penalty, along with ordinary income tax, on this large withdrawal. They came to me – too late – for a second opinion on this by then irreversible move; the damage had already been done.

Whether to pay off your mortgage early is a difficult decision that should be based on various factors. Depending on your situation, some debt—especially mortgage debt--is probably not as bad as the alternatives. In this case, not paying off the mortgage would have meant keeping the couple's 401(k) assets intact and growing in value through compounding interest, which is interest on principal and interest. Albert Einstein famously called compound interest "the most powerful force in the universe."

Read More...

When to pay down your mortgage

6/20/2013 7:30 PM ET By Liz Weston, MSN Money
For years, I've been telling you that you likely have better things to do with your money than to prepay a low-rate, tax-deductible debt such as a mortgage.

Yet my husband and I plan to have our mortgage paid off by the time we retire. Am I promoting a double standard? Not really. I'm just acknowledging the math, which favors carrying a mortgage while you're working and being debt-free when you're not.

Read More...

The Benefits Of Mortgage Repayment

October 26 2011| Filed Under » Home Purchase, Mortgage
You've taken the leap and decided to buy a home. After signing a mountain of paperwork, you are now the proud owner of your own residence. Thirty days later, when the first mortgage payment comes due, you are hit by the reality of what you have done. You have taken on 30 years worth of massive payments, in an economy that makes no promises about long-term job stability. In this article, we look at the benefits of paying off your mortgage as soon as you can and give you pointers on how to do it. 

Read More...

4 ways to pay off your mortgage earlier

By Sally Herigstad • Bankrate.com

Paying off the mortgage early is in. Refinancing to take money out of our homes is out. Living through the foreclosure crisis, more people want the security and the psychological benefit of owning their home free and clear.

Read More...

Wednesday, October 30, 2013

Chocolate Substitution Chart

So I was cruising the net looking for really fun recipes and lo and behold I found Dulce de Leche Brownies. I read through the recipe and my mouth began to water. I looked through the ingredient list and arrrrggghhhh, I don't have one of the most important ingredients...unsweetened chocolate squares. My heart fell, but wait, it's the internet and I searched for a substitute and someone was thoughtful enough to post a Chocolate Substitution Chart. So I will share both the chart and the recipe.


Chocolate Substitution Chart - How To Substitute Chocolate In Your Cooking

Need a quick substitution for chocolate? Here are some chocolate substitutions, but remember not always do they work as well as the original recipe ingredient:

Chocolate, Bittersweet:

(1-ounce) square semi-sweet baking chocolate for 1 (1-ounce) square bittersweet baking chocolate.
Bittersweet and semisweet chocolate may be used interchangeably in recipes, but there may be slight differences in flavor and texture.

Chocolate, Semi-Sweet:
3 tablespoons chocolate chips for every 1-ounce semi-sweet baking chocolate.
1-ounce bittersweet baking chocolate for every 1-ounce semi-sweet bittersweet baking chocolate.
1-ounce unsweetened baking chocolate and 1 tablespoon granulated sugar for every 1-ounce semi-sweet baking chocolate.
3 tablespoons unsweetened cocoa powder, 3 tablespoons sugar and 1 tablespoon butter, margarine or shortening for every 1 ounces of semi-sweet baking chocolate. 
Chocolate Chips, Semi-Sweet:
1 ounce semi-sweet baking chocolate for every 1 ounce of semi-sweet chocolate chips.
1-ounce sweet baking chocolate for every 1-ounce chocolate chips.
1-ounce unsweetened chocolate plus 1 tablespoons sugar for every 1-ounce chocolate chips
Chocolate, Sweet Baking (German's):
3 tablespoons unsweetened cocoa powder, 4 teaspoons sugar, and 1 tablespoon butter, shortening or vegetable oil for every 1-ounce German's sweet baking chocolate.
1 ounce dark sweet chocolate for every 1 ounce German's sweet baking chocolate.
Chocolate, Unsweetened:
3 level tablespoons unsweetened cocoa and 1 tablespoon butter, margarine or shortening for every 1-ounce unsweetened baking chocolate.
3 level tablespoons Dutch-process cocoa plus 1 tablespoon shortening, butter, or oil for every 1-ounce unsweetened baking chocolate.
1/2 cup (3 ounces) unsweetened chocolate chips or morsels - plus cut sugar by 1/4 cup and shortening by 1 tablespoon in your recipe.
Chocolate, White:
Substitute 1-ounce milk chocolate or white chocolate chips for every 1-ounce white chocolate. (Color and flavor will vary.) 
Cocoa, Unsweetened:

Substitute equal amounts of Dutch-processed cocoa for unsweetened cocoa. Leave out any baking soda called for in the recipe.
3 tablespoon carob powder plus 2 tablespoons water for every 1-ounce unsweetened cocoa.
Do not substitute instant cocoa mix for unsweetened cocoa in any recipe.
Dutch-Process Cocoa:
3 tablespoons unsweetened cocoa powder plus a pinch (1/8 teaspoon) baking soda for every 1-ounce Dutch-Process Cocoa.
1 ounce unsweetened chocolate plus 1/8 teaspoon baking soda (reduce fat in recipe by 1 tablespoon).
3 tablespoons carob powder for every 1-ounce Dutch Process Cocoa.
Mexican Chocolate:

1 ounce semi-sweet chocolate and 1/2 teaspoon ground Mexican cinnamon for every 1-ounce Mexican Chocolate.
In mole sauces, substitute 1 tablespoon cocoa powder for every ounce of Mexican chocolate called for in the recipe.
Milk Chocolate:
Substitute equal amounts of sweet chocolate OR semi-sweet chocolate for milk chocolate.
Do not substitute chocolate syrup for melted chocolate in any recipe. 


And now the Dulce de Leche Brownie Recipe.

This is from a new cookbook The Pioneer Woman Cooks: A Year of Holidays by Ree Drummond. The book is available on Amazon for the Kindle and as a Hard copy. Pioneer Woman Cooks ebook @ Amazon

Dulce De Leche Brownies on twopeasandtheirpod.com These brownies are amazing!

Dulce De Leche Brownies

Yield: 16 brownies      Prep Time: 20 minutes     Cook Time: 50 minutes     Total Time: 80 minutes

Ingredients:

5 (1-ounce) squares unsweetened chocolate     
1 cup butter, softened
2 cups granulated sugar                                     4 large eggs
1 1/4 cups all-purpose flour                                Half a 14 oz can dulce de leche

Ice cream and additional dulce de leche, for serving, optional

Directions:

1. Preheat the oven to 325 degrees F. Generously spray an 8-inch square baking pan or an 8 x 10-inch baking pan with nonstick baking spray.

2. Place chocolate in a microwave-safe bowl and heat it in about 45-second intervals, stirring each time, until it's completely melted. Set it aside to cool for 20 minutes or so.

3. Add the butter and sugar to the bowl of an electric mixer fitted with the paddle attachment. Cream together until light and fluffy.

4. Add the eggs, one at a time, beating well after each addition.

5. With the mixer on low, slowly drizzle in the melted chocolate. Mix until combined.

6. Add the flour and vanilla extract. Mix until combined, scraping down the sides of the bowl halfway through.

7. Spread the batter into the greased pan.

8. Place the dulce de leche in a glass bowl. Warm it in the microwave for 30-45 seconds. Drop large dollops of dulce de leche on the surface of the brownie batter. Use a knife to slowly swirl it through the brownie batter. Don't drag the knife sideways through the batter, hold it so the thin side of the knife leads the way.

9. Bake brownies for 45-50 minutes, or until the center is almost totally set.

10. Let the brownies cool in the pan for 15 minutes. Carefully turn them out of the pan and let them cool completely.

11. Cut the brownies into squares and serve. Top with ice cream and extra dulce de leche, if desired.


Recipe from The Pioneer Woman Cooks: A Year of Holidays

Wednesday, October 2, 2013

Dried to Canned Beans Conversion


DRIED TO CANNED BEANS CONVERSION


1 - 15-ounce can of beans equals

  • 1/2 cup dry beans, before cooking
  • 1 1/2 cups beans, after cooking


1 pound dry beans equals
  • 2 cups dry beans, before cooking
  • 6 cups beans, after cooking
  • 4 15-ounce cans of beans

1 part dry beans equals
3 parts cooked beans

http://be-it-ever-so-humble.blogspot.com/2008/11/dried-to-canned-beans-conversion.html

Friday, September 20, 2013

Changes are coming to the Home Storage Centers

As of November 1st, packaging at our Spokane Home Storage Center will be discontinued. After November 1st, those interested in purchasing food storage items will find prepackaged items and bulk items as listed on the current Home Storage Order Form. Because the system needs to build up stock levels and adjust for the upcoming demand, all of the planned 17 pre-packaged items may not be available at first.
For the time being, the cannery will continue providing the packaging materials for home packaging.
The cannery will not order any more bulk product from Utah for the 17 products that will be prepackaged. They will receive bulk stock to be sold until it runs out, which may be before November 1st for some of the items.

Homemade Seasoning Mixes


Make your own Ranch, Dry Onion Soup Mix and Taco Seasoning and store in small mason jars....This is soooo much HEALTHIER than those you buy at the store!! They contain a TON of stuff that is not good for you!!

Taco Seasoning:
1/2 cup chili powder
1/4 cup onion powder
1/8 cup ground cumin
1 tablespoon garlic powder
1 tablespoon paprika
1 tablespoon sea salt
Put ingredients into a jar and shake.Use 4 tablespoons in a recipe in place of 1 packet of taco seasoning. Store in a cool, dry place.

Dry Onion Soup Mix:
2/3 cup dried, minced onion
3 teaspoons parsley flakes
2 teaspoons onion powder
2 teaspoons turmeric
1 teaspoon celery salt
1 teaspoon sea salt
1 teaspoon sugar
1/2 teaspoon ground pepper

Mix all ingredients in a jar, then give the jar a good shake. I’d recommend shaking the jar to mix the ingredients well before each use.
Use 4 tablespoons in a recipe in place of 1 packet of onion soup mix. Store in a cool, dry place.

Ranch:
5 tablespoons dried minced onions
7 teaspoons parsley flakes
4 teaspoons salt
1 teaspoon garlic powder
Mix together and store in an air tight container.
For dressing: Mix 2 tablespoons dry mix with 1 cup mayonnaise and 1 cup buttermilk or sour cream.
For dip: Mix 2 tablespoons dry mix with 2 cups sour cream or Greek Yogurt.
Mix up a few hours before serving, so the flavors all blend.

Tuesday, February 19, 2013

Spring Is Just Around the Corner


Starting Our Seeds Indoors – Let Spring Begin!

It’s always such an incredible feeling each year to finally start putting seeds into the soil. It gives you that sense Spring is finally close at hand! So what if there is still a little snow on the ground outside from yet another passing storm system - once you put a few seeds into soil, it’s time to grow! We finally planted the first of them yesterday – our ornamental peppers. The Ornamental Peppers tend to take a little longer to germinate and grow to full maturity – so we like to give them an additional head start by planting in Mid-February. read more...

Spring Cleaning is on it's Way!
I hate spending money on a cleaner for the glass, one for the walls, one for the floor, one for the toilet, one for the shower, there is an all purpose cleaner than is good for all of this and much more read 45 Uses for Vinegar

Teaching Children About Money
Teaching your kids about money is an important lesson that should be taught early. How early? Many experts recommend starting as early as 3 years old, teaching simple concepts, such as: what is money, how you need money to buy things and money is earned by working. read more...


Sunday, May 13, 2012

Chicken and Veggie Filled Biscuits

If you're looking for a meal to please the kids in the house (or anyone else for that matter) this is definitely a recipe to try. It comes from the book "The Everyday Gourmet" and it's great! For the biscuit recipe, rather than using a mix, try using the "Backcountry Biscuits" recipe from the same book and it works out perfectly while also helping to rotate some of the long term ingredients.


Makes 12 biscuits


Prep time: 30-40 minutes

Ingredients:
Filling ingredients:
2 cups water
1/2 cup each of your choice vegetables (corn, peas, potatoes, carrots -- freeze dried, or canned)
1 cup white cream sauce
1 (12.5 oz.) can chicken
1/2 tsp ground dried rosemary or tarragon (optional)

Backcountry Biscuits ingredients:
3/4 tsp. cream of tartar
1 tsp. salt
3 cups flour
4 1/2 tsp. baking powder
2 TBS sugar
1 egg (2 TBS water mixed with 1 TBS egg powder)
3/4 cup butter (a little less than 1/2 cup water with 3/4 cup butter powder) *see note
1 cup milk (1 cup water mixed with 2 TBS milk powder)

Instructions:

To make biscuits:

Reconstitute butter, egg and milk powders. In a bowl, mix in cream of tartar, salt, flour, baking powder and sugar. Cut in butter with a pastry blender until it looks like cornmeal. Add the egg and milk and stir just a bit. On a floured board, knead the dough lightly until smooth. Fold and roll out to 12" - 6". Fold and repeat three times. Roll out dough to 3/4" thick. Cut to 3" rounds.

To make the filling:

Rehydrate vegetables if needed. Over low to medium heat combine 2 cups water and 1 cup white cream sauce powder. Mix in the vegetables and canned chicken and simmer and stir until thick. Add optional spices and salt and pepper to taste if needed.

Drop about a tablespoon of the filling in the center of 12 of the 3" rounds of dough. Place the other 12 rounds of dough on top of the filling and gently seal the edges with the tines of a fork. If needed, dip the tines in flour to keep them from sticking. Prick the top of each sealed biscuit 3 times with the tip of a knife. Bake at 425 for 10-12 minutes or until lightly browned. Spoon remaining warmed sauce on top of the biscuits to serve.


Saturday, May 12, 2012

Growing Salad Greens in Window Boxes


Don't let a lack of garden space keep you from growing and enjoying fresh veggies! With this plan, you can start harvesting fresh, flavorful, nutritious salad ingredients in about a month.

Tools and Materials
Two planters at least 8 inches deep (such as window boxes), with drainage holes
Seeds: radishes, mesclun mix, baby carrots, beets (shredded raw beet is a tasty and colorful salad topping)
Soilless potting mix enriched with compost
Fertilizer

1. Moisten your potting mix. If you wish to use a slow-release fertilizer, add it as recommended by the product label. Fill window boxes, and firm soil gently in place.

2. Following the directions on the seed packets, sow seeds of radishes and greens in one box, beets and carrots in the other. Radishes are ready to harvest about 28 days after germination; baby greens (lettuce, spinach, mesclun), in 30 days; beets, in 55 days; baby carrots, in 70 days.

3. Water gently so that you don't wash seeds out of the soil. Keep soil evenly moist, and watch for seeds to germinate.

4. Seedlings will come up thickly; thin them the first time to stand 1 inch apart. You can either pluck them out individually or use scissors to snip seedlings at the soil surface. (Eat the thinnings of greens and beet tops -- your first unofficial harvest!) Thin the carrots and beets again when they've doubled in size; ultimately they should stand 2 to 3 inches apart.

5. Fertilize every two weeks, unless you used a slow-release fertilizer at planting time. Use a water-soluble formula, such as fish emulsion.

6. Sow some more. As your harvest of greens and radishes makes room in that container, prepare to grow another round. Work an inch of compost into the empty spots and sow more seed.
Tips

If you have enough space, add containers for other salad favorites, such as tomatoes and cucumbers. (They need larger pots.)

Watch out for pesky squirrels -- they like to dig in freshly disturbed soil. If they're a problem, cover your planters with wire mesh or fabric row covers.

For color and spicy flavor, sow a few nasturtium seeds in your containers. The flowers are beautiful, fragrant, and tasty in a salad!


http://local.garden.org/How_To_Project_Growing_Salad_Greens_in_Window_Boxes_Spokane_WA-r1216559-Spokane_WA.html

Friday, May 11, 2012

Skillet Penne with Sausage and Spinach

This meal is a fast one to put together and everyone likes it!

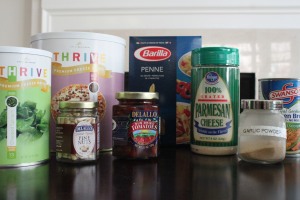
It’s based off a favorite one dish meal, this time made over using food storage ingredients. The pine nuts are definitely optional, it’s good with or without them.


Ingredients: 
2 1/2 cups freeze dried sausage crumbles (rehydrated using 2 cups warm water)
1/2 tsp garlic powder
1/2 tsp. salt
1 (16 oz.) box penne pasta
1 (14 oz.) can chicken broth
1 (6.5 oz.) jar sun dried tomatoes, 1/2 jar chopped fine (*see note)
1/3 cup freeze dried spinach (rehydrated using 1/4 cup water)
1/2 cup grated Parmesan cheese
1/4 – 1/2 cup pine nuts, optional

Instructions:
Rehydrate sausage crumbles according to package directions and drain reserving liquid in a measuring cup. To the reserved liquid add water to measure 2 1/4 cups. In a skillet over high heat, add sausage crumbles, chicken broth, sun dried tomatoes, measured liquid, penne pasta and 1/2 tsp. salt. Stir to combine, covering the pasta as much as possible with the liquid. Cover the pot and cook, lifting the pot’s lid every so often to stir until penne is tender, about 15 minutes. Turn off heat and add rehydrated spinach, parmesan cheese and nuts. Season with salt and pepper to taste.  Serves 6-8

***

Rehydrate the sausage crumbles and add ingredients to the skillet.


Rehydrate the spinach just before adding into the skillet.


Add last three ingredients…


Serve!


~~~~~~~~~~~~~~~~~~~~~~~~~~~

Notes:
It may not seem like the liquid called for will be enough to cook the pasta but it will be, I promise! Keep the lid on the skillet as it cooks, just lifting the lid to stir the pasta around off and on until the penne is tender.

I only use about half of the small jar of sun dried tomatoes here, the rest could be used to flavor up a bread recipe or if you really like them you could try using more in the dish itself.


Thursday, May 10, 2012

Growing Vegetables in Containers


If you don't have room for a garden, or only want to grow a few vegetables, planting in containers is the best way to go. Almost any vegetable can grow in a container and with a little care can produce abundantly. Here's how to get started.
Tools and Materials
Containers of various sizes
Sterilized potting soil
Shovel
Trowel
Drip or hose irrigation
Fertilizer

It's all in the pot. When selecting a container, remember that bigger is better as far as ease of maintenance and size of harvest. Half whiskey or wine barrels or similar-sized pseudo terra-cotta containers are large enough to accommodate vegetables such as large tomatoes, eggplant, and squash, with room to spare for companion plantings of smaller choices such as carrots and lettuce. Five-gallon containers can hold dwarf tomatoes, peppers, beans, and many small leafy greens. A window box is even large enough to grow radishes and arugula.

And in the soil. For proper drainage, containers need to have holes in the bottom. Also, use only sterilized potting soil. Garden soil may contain diseases and may not be well drained. Because you're planting in such a small space, you'll have to be very conscious of watering and fertilizing regularly. Water with drip irrigation or by hand whenever the soil is dry 4 to 6 inches deep.

Fertilize every two weeks with a water-soluble fertilizer for vegetables, or add controlled-release fertilizer at planting time, supplemented with a water-soluble fertilizer when needed. For large containers, mulching with straw or bark conservs moisture.

Best plant combinations. Containers allow you to plant combinations that are both edible and attractive. For example, try creating a salad container with different colors of leaf lettuce, a bush cucumber, a dwarf patio-type tomato, and even herbs such as parsley. How about a tomato sauce barrel with a tomato plant in the center, herbs such as oregano and basil on the sides, and onions interplanted between the herbs? Or a root crop roundup container with beets, carrots, radishes, onions, and parsnips in a foot-deep container?

Tips

Choose bush varieties of large vegetables such as squash.

Production may be less than with full-sized kinds, but plants will be much easier to care for.

To save space, consider growing some plants up. Choose pole beans over bush beans, and trellis them along the back of a container. This leaves space in front to plant other vegetables.

Photography from the National Gardening Association.

http://local.garden.org/Growing_Vegetables_in_Containers_Spokane_WA-r1216583-Spokane_WA.html

Wednesday, May 9, 2012

Spanish Rice, two varieties

Forget the Rice-a-Roni. These two wonder oven made rice dishes are just as easy to make and taste a whole lot better! Left overs freeze well so you can even enjoy it later when it’s needed for a fast meal. In using with your food storage plan, serve this with Creamy Chicken Enchiladas, Shredded Beef Taquitos, Tacos, Tamales or any other fiesta minded main dish.

Traditional Spanish Rice
Ingredients: 
1 medium onion (or 1/2 cup freeze dried onion flakes, re-hydrated)
1 tsp. garlic (or 1/2 tsp. garlic powder)
2 TBS olive oil
2 cups rice
1 tsp. salt
1/4 – 1/2 tsp. white pepper (recipe calls for 1/2 tsp. but my family prefers 1/4)
1 (14.5 oz) can chicken broth
1 (8 oz.) can tomato sauce
1/2 cup salsa, any kind

Instructions:
Heat the oil in a sauce pan over medium low heat. Add the onion and garlic. Cook for 2 minutes.

Add the raw rice, salt and pepper. Cook, stirring occasionally until rice turns a golden color, about 5 minutes. Add to the rice the can of chicken broth, tomato sauce and salsa and stir together. Bring to a boil with the lid on (the lid should be hot) and transfer pot to wonder oven. Allow to cook in wonder oven for at least 45 minutes. Fluff with a spoon and serve.  Serves 8

****


~~~~~~~~~~~~~~~~~~~~~~~~~~~~~~~~~~~~~~~


Tomatillo Pilaf
This is a nice alternative to traditional spanish rice.
Ingredients:
1 medium onion (or 1/2 cup freeze dried onion flakes, rehydrated)
1 tsp. garlic (or 1/2 tsp. garlic powder)
2 TBS olive oil
2 cups rice
1 tsp. salt
1/4 – 1/2 tsp. white pepper (recipe calls for 1/2 tsp. but my family prefers 1/4)
1 (14.5 oz.) can chicken broth
1/2 cup water
1 (8 oz.) can salsa verde
1/8 cup lime juice

Instructions:
Heat the oil in a sauce pan over medium low heat. Add the onion and garlic. Cook for 2 minutes.

Add the raw rice, salt and pepper. Cook, stirring occasionally until rice turns a golden color, about 5 minutes. Add to the rice the can of chicken broth, 1/2 cup water, can of salsa verde and lime juice and stir together. Bring to a boil with the lid on (the lid should be hot) and transfer pot to wonder oven. Allow to cook in wonder oven for atleast 45 minutes. Fluff with a spoon and serve.  Serves 8

*****


Serve either rice dish (or both, freezing the leftovers) with your favorite Mexican entree. Tonight we paired it with red enchiladas. Yum!


~~~~~~~~~~~~~~~~~~~~~~~~~~~~~~~~

Notes:
When cooking rice in a wonder oven you’ll want to decrease the water just a little since the water doesn’t evaporate away. To 2 cups white rice you should add 3 1/2 cups liquid, in cooking 2 cups of brown rice add 4 cups liquid.


Tuesday, May 8, 2012

Vegetable Garden


You can plant many crops directly in the garden, especially root vegetables, crops with large seeds, and seeds of plants that can mature within your growing season. The correct time to plant each crop varies widely according to the climate where you live and the specific needs of each crop.
Tools and Materials

Soil thermometer
String and stakes
Measuring tape
Steel rake
Hoe
Vegetable seeds
Water source
hose
watering can
Floating row cover, optional


When to plant. In general, plant cool-season crops (peas, lettuce, greens, cole crops, and root crops) so they can mature before the onset of mid-summer heat or freezing autumn weather. Some, such as peas and spinach, will germinate in soils as cool as 40° F. Most cool-season crops will germinate and grow if planted about two weeks before the last spring frost.


Plant heat-loving, warm-season crops (such as squash, beans, corn, melons, and cucumbers) only after the soil has warmed, about two weeks after the last frost in spring. These crops require soil temperatures between 60° and 70° F.


Choose planting pattern. Plant most seeds in 1- to 3-foot-wide beds instead of single-file rows. Wide row planting reduces weeding and watering needs and increases the yield per square foot by decreasing the space needed for paths between rows. Single-row planting works best for corn and climbing peas and beans. Plant vine crops (squash, cucumbers, gourds, and pumpkins) in 1-foot-square beds, spaced 3 to 6 feet apart. Plant 4 to 6 seeds in each bed.


Prepare soil. When the soil is dry enough to crumble after squeezing and warm enough to plant, add compost and other amendments, as necessary (see "Preparing a New Garden Plot"). Mark the rows with string and stakes, if desired, leaving 2- to 3-foot aisles between rows. Smooth the soil in the rows with a steel rake. Break up large clods and remove stones and debris.


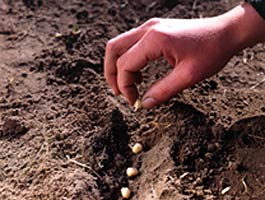
Sow seeds. Plant seeds at a depth equal to two to three times their diameters and as far apart as recommended on the seed packet. In wide row plantings, you can space large seeds, such as beans, on the soil surface and then push them into the soil with your finger. Scatter small seeds, such as carrots, over the prepared row and sprinkle soil over them. Tap the soil gently with the back of a hoe or the palm of your hand. In single-row plantings, make a furrow at the proper planting depth with the corner of a hoe blade. Space the seeds in the furrow and cover with soil.


Water and care. Water the planted rows with a gentle spray from a hose or watering can without disturbing the soil. Keep the soil evenly moist, especially while the seedlings sprout and become established. Protect from frost and grazing animals with a floating row cover, if necessary.
Tips


The number of days listed on the seed packet refers to the time needed to mature a crop after sowing seed or transplanting into the garden. Choose varieties that can ripen within your growing season.


If your space is limited, try compact vegetable varieties; crops that provide a high yield per square foot, such as root vegetables; and trellises for vining plants.


Photograph by National Gardening Association.


http://local.garden.org/Planting_a_Vegetable_Garden_Spokane_WA-r1216574-Spokane_WA.html#

Monday, May 7, 2012

Rice Pudding


Rice Pudding


Make for dessert one night, eat for breakfast the next day, and put it in lunch bags as a treat for lunch. It’s easy to make in the wonder oven, includes simple ingredients and even though the recipe doesn’t call for eggs it’s still thick and creamy. Yum!


Ingredients:
1 cup rice
1/2 cup raisins (optional)
1 tsp. vanilla
1 (14 oz.) can sweetened condensed milk
1 (12 oz.) can evaporated milk
sugar and cinnamon for sprinkling

Instructions:

Cook 1 cup rice (normally) using 2 cups water and 1/2 tsp salt. If you already have 3 cups of cooked left over rice you can skip ahead.

In a pot, combine 3 cups cooked rice with evaporated milk, sweetened condensed milk, raisins and vanilla. Bring to a boil, with the lid on until hot, and transfer to wonder oven to cook. Allow to cook for about and hour and a half (minimum) to two hours until liquid is absorbed (*see notes for stove top cooking instructions). If left longer it’ll be fine, you’ll just need to add some milk to cream it up again. Serve warm. 
 Makes 6-8 servings

****


Sprinkled with cinnamon and ready to serve!


~~~~~~~~~~~~~~~~~~~~~~~~~~~~~~~~~~~~~~~~~~

Notes:
To cook on the stove top you don’t need to bring the mixture to a boil, instead cover and cook on low setting 3-4 hours until liquid is absorbed. Stir pudding occasionally.

Reclaiming Yarn from Old Sweaters

Fair Warning: I have not yet tried this, but do plan to in the future. This tutorial is from laughing purple goldfish designs. It seemed like such a great idea, I thought I would share.


laughing purple goldfish designs blog:

Much of yarn recycling is trial and error... and everyone develops their own little techniques along the way. I have put together a series of photos which step you through my recycling process, to give you an idea of what is involved.

You will certainly have a million questions for me, especially once you actually start experimenting with the process. Ask away... I'll share everything I know with you!

There seriously are loads of photos here, but the basic steps I follow are:

air the garment
remove trimmings and tags, and undo seams
unravel each piece
wind into a skein
wash
dry
ball

If you are a beginner, I would recommend starting with a single coloured garment, preferably in a simple stockinette. I would avoid cables, fair isle, and anything complicated... until you have had a little practice first. Stick with a standard jumper if possible, and avoid cardigans, coats, or anything with a zipper. A hand knit would be ideal, if you have access to one. Avoid any yarn which looks fluffy or furry or hairy or boucley... because they will be difficult to unravel.

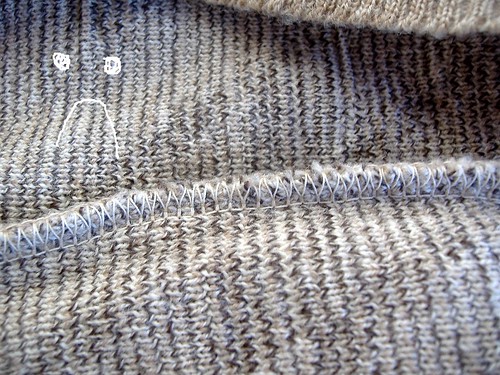
Before I start, I always check the seams. There are 'good seams' and 'bad seams' when it comes to recycling. Overlocked or serged seams are BAD. You will find that the yarn has been cut at the end of every row... so you will end up with lots of short yarn pieces... ugh! So always check the side seams and inner arm seams.

Don't worry if the shoulder or neck seams are overlocked. Because they run across the top of the garment and not down the sides, they are not of concern.

so... some examples of bad seams:


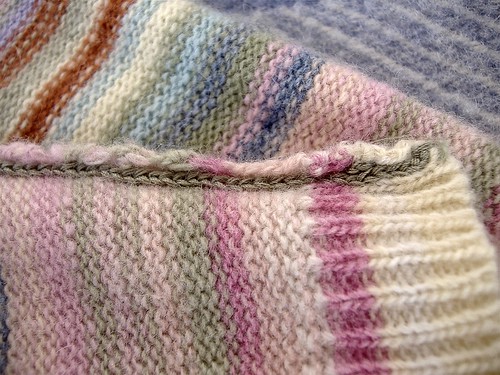
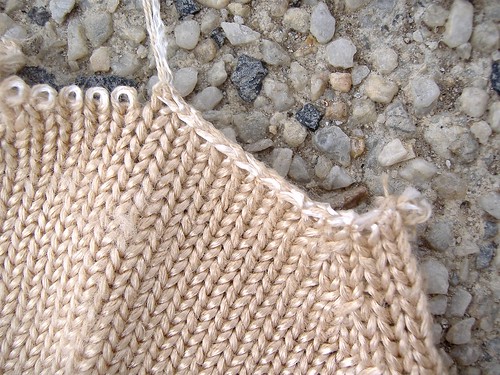
and these are good seams:


So... if the side seams are bound together by overlocking - BAD!

As for hand knits... all of their seams are GOOD... you don't even need to check them!


Time to get started now...


I don't bother washing the garment before I start. Two reasons... Firstly, I don't want to risk any felting or matting of the yarn fibres which would make it more difficult to unravel. Secondly, the yarn is cleaned much more effectively if you wash it AFTER it is skeined.


So I just leave it out on the line for a while, just to 'freshen' it before I start working with it.


I use an unpicker and a pointy pair of scissors to remove tags, labels, buttons, zips, and any other trimmings.


Then I unpick the seams. Most store bought jumpers are seamed using chain stitch, which is wonderfully easy to undo. See the way the chain stitches form little arrows, pointing down in the photo? Well that tells you the direction to unravel in. So cut the top one, free the tail... and pull... it should unravel in seconds.


So now you have all the seams undone (this one had a seam down the centre of the back piece for some strange reason - probably a design feature)


Now it's time to start unraveling each piece, generally working from the top down. The cast off edge forms the same V stitches as chain stitch, and again they point in the direction you need to unravel. So start at the top end and snip, free a tail... and away you go.

Sometimes you might have a hard time getting started. If it's a nightmare for you, just chop the top few rows off, and then start unraveling. You will only loose a few yards of yarn, and it will save your sanity!


I like to roll the garment piece, so I can grip it nicely while I unravel.


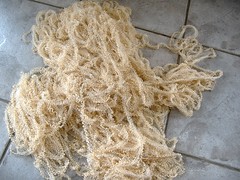
I have heard this kind of display referred to as 'yarn barf' and I think it's a wonderful description.

Anyway, if I am working indoors and am going to be able to skein the yarn immediately, then I just pile it on the floor as I unravel. If I am working outdoors I would wind into a ball as I go, and then skein from that... because you really don't want to get this in a tangle!


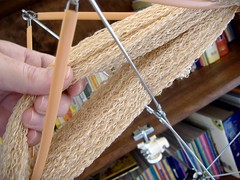
You can wind your yarn into a skein using two chairs like this...


Or using a skein winder if you have one. This one was a fabulous gift from Mr Goldfish last Christmas... and I love, love, love it!


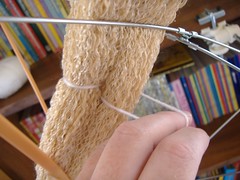
Once it is all wound on, you need to tie the skein in a figure eight. Use some scrap yarn. I like to use a contrast from the yarn you have wound, so that the ties are easy to locate and removed after drying. I recommend using a light colour, because you would cry if the colour ran from your ties onto you nice new recycled yarn.

First divide the yarn in half as pictured above.


Then pop a scrap piece of yarn through like this...


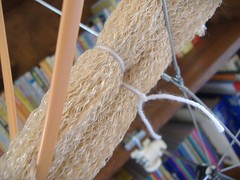
And back through again, forming a figure "8" with the tie.


Finish with a double knot.


I like to do this in six places around the skein to prevent tangling.


Wash by soaking in warm water and wool detergent. I'm a big fan of Martha Gardener's Eucalyptus Wool Mix, but I'm not sure if it is available outside of Australia.


Gently submerge the skeins. I prefer to soak all the yarn together, so that if it happens to lose any colour, all skeins will be affected evenly.


If possible, I leave it to soak overnight.


Then in the morning, I rinse it in a bucket of cold water.


Of course, with our current water restrictions here... that rinse water gets recycled directly onto my garden...


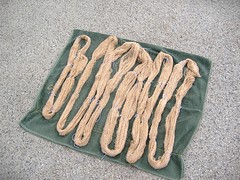
I gently squeeze the excess water from the yarn, and lay the skeins on an old towel.


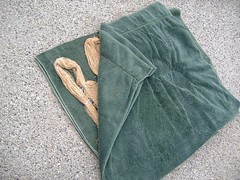
Then I lay another old towel on top.


Roll it up, and walk up and down the length of it for a minute or two. This helps absorb a significant amount of water from the skeins.


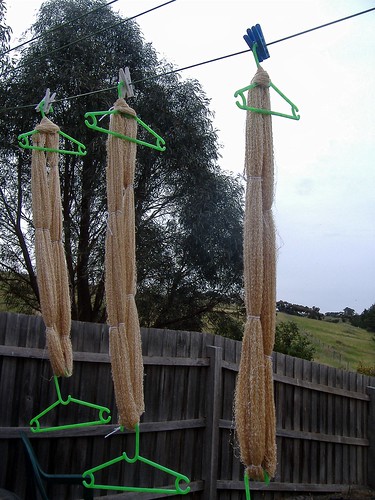
Then I hang each skein on a plastic coat hanger to dry. I also use a second hanger to 'weight' the yarn slightly, and help stretch some of those kinks out.

If the weather is wet, then I put the coat hangers along a curtain rail in a sunny window and dry the yarn indoors.


When dry, cut the ties off and place the skein back on to the winder or chairs. Find the end and wind into a ball. Click here for my ball winding tutorial.


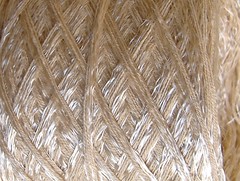
Interestingly the yarn I have claimed from this jumper is not that nice. I'm actually a bit disappointed with it. It looked nice in the garment, but is now a bit ugh! See the sheen in the balls. That is the rayon component. I liked that sheen until I started unraveling...


You can actually see the cotton and rayon strands here.

The rayon is harsh and grabby and kind of brittle. It actually reminds me of over bleached hair. I'm thinking it may well become hair on a creature or doll at some point. If I want to knit or crochet with it I think I will have to ply it first. I might even ply it with a different yarn to make my own special blend.

I guess the thing is, not to give up... occasionally you get a bit of a dud (like this one) but that just pushes you to think of alternate project ideas.

Most of what I have learned on this topic is through experience, but if you would like to check out the tutorial I first read on the topic, then click here.

http://laughingpurplegoldfish.blogspot.com/